Self-hosting an Authoritative DNS server with PowerDNS - Part 3: Infra-as-Code and DNSSEC
Table of Contents
After putting our new self-hosted PowerDNS servers in production, it'd be fun to use Infra-as-Code with OctoDNS to deploy and version our DNS records, as well as to secure our DNS records with DNSSEC.
This article is one of a three parts series:
- A basic setup
- High-Availability and production
- Infra-as-Code and DNSSEC (this article)

Infra-as-Code with OctoDNS
Let's first talk a bit about IaC before jumping into it!
A short summary of both Infra-as-Code and OctoDNS
When you start working with any system after being used to version your code, you start to wonder "can I version my configuration as well, just like I do with my code?". Yeah, it'd be nice to be able to have a versioning system on our DNS servers: as it's a pretty critical system, we could rollback or overwrite whatever's causing problems in case of an issue.
OctoDNS is just that! A way to describe the DNS records and zones state and configuration in a readable and version-able way, using the DevOps' favorite format ever: YAML files!
(joking, we have so many products using the "Yet Another Markup Language" format that we should invent "Yet Another Product Using Yaml": "YAPUY")
Enabling PowerDNS' API
Before being able to query the PowerDNS API, we first need to enable it. Luckily,
this is very easy to do, just modify these values in the /etc/powerdns/pdns.conf
configuration file:
api=yes
api-key=a super secret string that YOU chose randomly
webserver-address=0.0.0.0
webserver-allow-from=0.0.0.0/0 # To customize to allow your specific range
These options enable the API and set the API key, as well as allow external queries.
I would strongly suggest NOT to expose your PowerDNS API on the wild internet without a proper firewall configured first to restrict access to your IPs.
To apply this configuration, all that is left to do is to run
systemctl restart pdns.service.
Setting up the repository
Let's create a local Git repository, using the git init <path> command.
In this folder, we create a Python virtual environment using the
python -m venv venv command, and immediately add the newly-created venv/
directory to our .gitignore file, just to avoid it being pushed accidentally.
After that, we can activate this virtual environment by running
source venv/bin/activate.
We then install the octodns library as well as our OctoDNS PowerDNS provider:
pip install octodns octodns-powerdns
To make sure that dependencies and versions are consistent for all people
and environments using it in the future, we can now pip freeze them in a
requirements file:
pip freeze > requirements.txt
All needed dependencies can then be reinstalled in one easy command, using the
pip install -r requirements.txt command!
Creating the configuration and zone files
We can now create the root directory of our OctoDNS configuration files: config
and a (YAML) file named production.yaml to describe our production environment:
---
manager:
  max_workers: 2

providers:
  config:
    class: octodns.provider.yaml.YamlProvider
    directory: ./config
    default_ttl: 60
    enforce_order: False
  ns1:
    class: octodns_powerdns.PowerDnsProvider
    host: "192.168.1.10" # Replace here with your actual Authoritative server address
    scheme: http
    port: 8081 # Replace here with your actual Authoritative server API port
    api_key: env/NS1_API_KEY
    timeout: 10

zones:
  example.com.:
    sources:
      - config
    targets:
      - ns1
This file describes that we have a default DNS record TTL of 60 seconds with
only one nameserver, which can be accessed using the 192.168.1.10 IP adress,
and that its API is accessible on port 80, with an API key provided through the
environment variable named NS1_API_KEY.
Once the API key set to the environment variable and an empty example.com.yaml
file created in the same config directory the production.yaml file is located,
we can ask OctoDNS to validate our files:
octodns-validate --config-file ./config/production.yaml
If all is good, this command should return nothing.

Creating a few records
This time, we're going to focus on our (currently empty) example.com.yaml file,
which lists the records that we want to have for this example.com zone.
First, we'll create our NS records at the root of our zone:
---
'':
  - type: NS
    values:
      - ns1.example.com.
      - ns2.example.com.
This is what should be returned if we try to apply these using
octodns-sync --config-file ./config/production.yaml:
********************************************************************************
* example.com.
********************************************************************************
* ns1 (PowerDnsProvider)
*   Delete <ARecord A 3600, ns1.example.com., ['<your primary DNS server IP>']>
*   Delete <ARecord A 3600, ns2.example.com., ['<your secondary DNS server IP>']>
*   Update
*     <NsRecord NS 3600, example.com., ['ns1.example.com.', 'ns2.example.com.']> ->
*     <NsRecord NS 60, example.com., ['ns1.example.com.', 'ns2.example.com.']> (config)
*   Summary: Creates=0, Updates=1, Deletes=2, Existing=3, Meta=False
********************************************************************************
This tells us that we are going to update two NS records on the server ns1,
going from TTL 3600 to 60, and that we are about to erase the A records for said
NS servers.
As we didn't provide the --doit argument, octodns is only performing a dry-run,
which is good because here we forgot to add the IP adresses of our nameservers,
so let's add them:
---
'':
  - type: NS
    ttl: 3600
    values:
      - ns1.example.com.
      - ns2.example.com.

ns1:
  - type: A
    value: <your primary DNS server IP>

ns2:
  - type: A
    value: <your secondary DNS server IP>
Here, we added a TTL of 3600 for the NS records, but left the default of 60 for the A records associated with these nameservers.
We can now validate this configuration and apply it on our production servers:
octodns-sync --config-file ./config/production.yaml --doit

Setting up DNSSEC
Enabling DNSSEC is a good thing, as it ensures both:
- Data origin authentication: it validates that the records come from a cryptographically trusted source
- Data integrity: it cryptographically signs the presence (or absence) of records for a given request
Enabling DNSSEC in PowerDNS
To enable DNSSEC for our example.com. zone, we just need to run the following
command on our primary server:
pdnsutil secure-zone example.com
We don't need to run this command on the secondary server as it's getting the changes from our primary through its database replication.
If all is good, the command should return this:
Zone example.com secured
Adding NSEC ordering information for zone 'example.com', 3 updates
If it does, then congratulations! You just enabled DNSSEC on your nameservers for this zone!
To go a bit further, an improvement would be to setup NSEC3, which is more advanced and better suited:
pdnsutil set-nsec3 louis-vallat.dev '1 0 0 -'
pdnsutil rectify-zone example.com
This should return the following output:
NSEC3 set, Done, please secure and rectify your zone (or reload it if you are using the bindbackend)
Adding NSEC ordering information for zone 'example.com', 1 updates
Now, our zone is fully DNSSEC-configured, with NSEC3 aswell! Although, the work is not done, as we now need to tell our registrar some information to ensure a full chain of trust from the root servers to our records.
Adding the needed records for the registrar
Now that we are signing our records on our authoritative servers, we need to tell our registrar which key to trust, so that a full chain of trust from the root servers to our records can be established.
For this, we need to find a way to set something called DS records in our registrar's configuration panel for this domain.
When using OVH, you can just open the "DS records" tab in your domain view:

We can get the value to set using the pdnsutil show-zone example.com command.
This will return a description of your zone but should also end with a bunch of
lines starting with something like this:
ID = 1 (CSK), flags = 257, tag = <a number between 0 and 65536>, algo = 13, bits = 256	  Active	 Published  ( ECDSAP256SHA256 )
CSK DNSKEY = example.com. IN DNSKEY 257 3 13 <a long base64-encoded string> ; ( ECDSAP256SHA256 )
Most of the information needed for your registrar is on the first of these two
lines, especially the flag, tag and algo. The base64-encoded public key is
shown on the second line after IN DNSKEY 257 3 13.
Once everything is configured on our registrar's configuration panel, we can wait a bit for it to propagate, before testing that our DNSSEC configuration is correct with a tool like DNSViz.
If you did everything right, you shouldn't get any error or any warning, just like this domain of mine:

As you can see, this domain is fully secured with a correct and complete chain of trust from the root server to my records.
You also get a more precise and verbose result using DNSSEC Debugger, which shows something like this for the same domain:
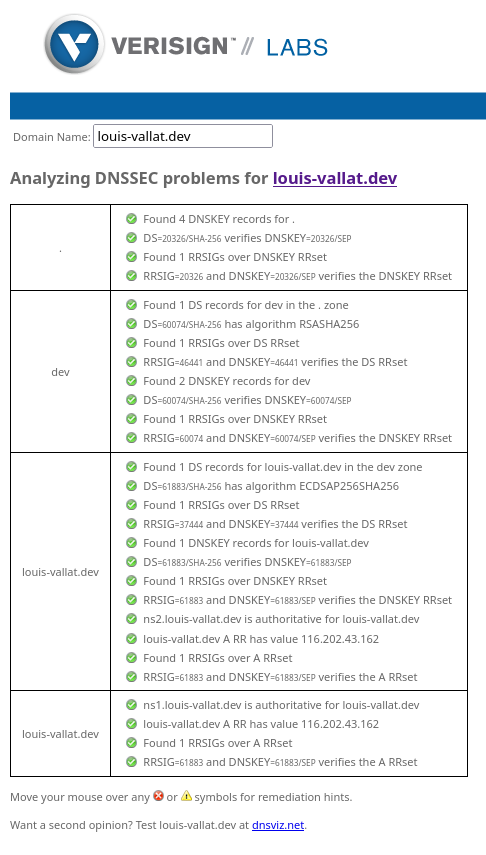
The end
This is the end of this article series! You just configured your own name servers, hosting your own domains with high availability and replicated servers, in production, with DNSSEC, all while managing it using Infra-as-Code!
Congratulations, and see you in another article!